Celebrating Twins

Made for the ModSquad challenge to use patterned paper and also for a friend whose daughter has had twins. I cut out a large heart for the background and then using a Spellbinder die called Layered Happy Birthday, I cut out some balloons from other PP and added them to the heart. Using an unbranded double stitch rectangular die I cut the main panel and added a small scrap of marbled paper on top. I fussy cut two matching little bears from another small piece of PP, after stamping them and colouring in certain parts. I popped them up onto this and added a small fussy cut fairy above. Stamped the sentiment which I also fussy cut out. Added a few small gems here and there. Stamps and card stock all from Gina K. Designs my main go to place for ideas and purchases.

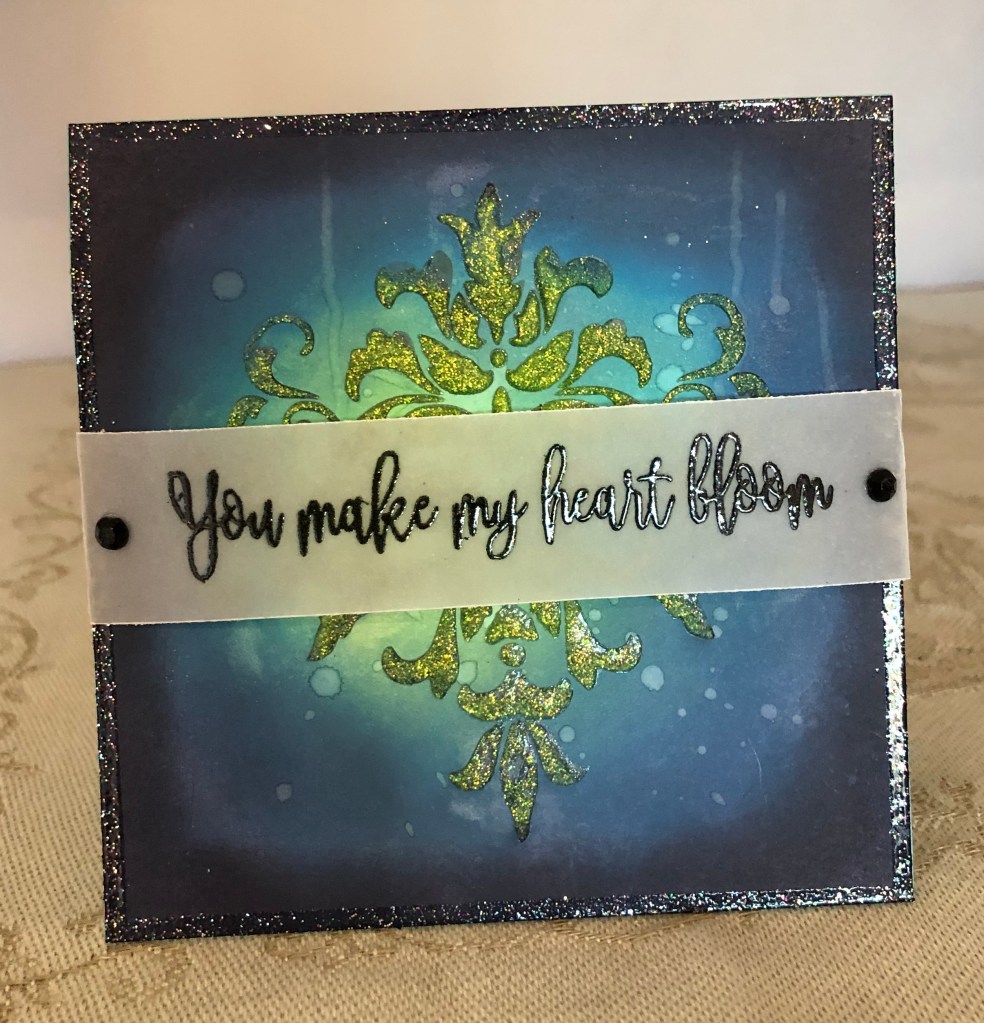
Heart Bloom – My sentiments Exactly challenge.

Used another of my gifted stencils to create this one. First brushed colour in circles using distress oxides. Sprinkled a bit of water and let dry. Using Mowed lawn I sponged through stencil to get design. When dry I added nuvo glimmer paste through stencil. I used a versamark pen and ruler to draw a line around edge of card stock and then added an old glitter embossing powder on top. heat embossed to give the shine at edge. Added sentiment to a piece of vellum and heat embossed in black. Two black gems added to each end. added entire piece to turquoise sea card stock.

A new beginning

I’ve been thinking about creating a blog for over a year now and am finally getting around to actually doing it. In order to showcase some of my cards I needed a place to upload them and display them for others to see so here is my first card for the year.

This card has been created for the monthly challenge at Gina K. Designs. We have to showcase a sentiment and cannot use others stamps on the card.

I stenciled Distress Oxides in several pinks using a lovely hand made heart stencil given to me by a great on line friend. I first masked off the area where the sentiment heart is. I stenciled the butterflies using another stencil from the same friend. I stamped the sentiment onto the die cut heart and traced over it with a gelly roll pen to add a bit of sparkle. I popped it up slightly offset over a black heart which I then glued in the masked off space. Added a few tiny bling gems in places. I added main panel to a black piece of card stock and then adhered it to the card front.

FRIEND

A twofer to fit these challenges: (DD 8/26) WHEN LIFE HANDS YOU LEMONS Challenge and Seize the Birthday #333-No Stamping Dies Only.

I had begun this card but didn’t get it finished before our house guests arrived. I thought perhaps I wouldn’t manage to complete it, but this morning my hubby and Ron are putting up a special rail for his photograph gallery and Dale is outside doing our garden. I’m in charge of the kitchen but in between I managed to put this card together so I could post it. These particular friends are amazing and always end up helping with something.

My card uses a Spellbinder folder and dies for the lemon arrangement, a die from Craft Addictions UK and a word die from MFT. Although it is hard to tell from the photo I did swipe a light yellow ink over the raised parts. It shows more in real life.

After die cutting all the small pieces I spent the time arranging and gluing until I was happy with the look. I then added it to the small green piece before adding that to the embossed section. The word was die cut in gold and attached at the bottom and then the entire layer was added to a note card.

In a minute I shall be making lunch and helping haul away some of the garden waste that Dale produces. She tells me she suffers from withdrawal symptoms if she doesn’t manage to be working in a garden for a few hours. Everyone should be as lucky as we are to have friends like these in ones life.

Have a great day everyone and thanks for stopping by. I do appreciate it.

Quacker

Welcome to a 3-2-1 new recipe at Double Trouble. This one entitled “Scrappers GORP”. You need: 3 patterned papers, 2 colours of choice (neutrals do not count, but can be used in addition) 1 image. Thing 3 Twisted Sister has the opt. to use stitches on the project and Thing 2 is a Double Dare Opt. to add to the TSOT #703 Sketch.

Although I followed the sketch, I would be breaking backlinking rules if I added it so be aware of this rule.

Having purchased a couple of new stamp and die sets from Craft Addiction UK I was excited to use them on this project. I have used a couple of the stamps here as well as the center pieces from the frame die set. First I chose my papers and let them also be my colour choices, in my case more than 2. Then following the basic sketch idea I added my papers as you see. All of them come from a SSS kit so are colour coordinated. After stamping my Duck I coloured him with a combination of water colour pencils then when dry, die cut him. To give him some dimension I cut a few more gluing and stacking them together. I realized that I had forgotten the optional twist but found the stitched oval leftover piece on my desk so I swiped it with a yellow ink pad and added the sentiment on top. After adding a few flat embellishments I decided it was finished.

It is going to be interesting to see what you all come up with when you participate in this challenge. There is so much choice in papers and colours. Have fun creating. Thanks for stopping by, I appreciate that you do.

A Little Bird …

Welcome to the latest Double Trouble recipe challenge #224. Thing 1 – 3 Patterned papers, 2 colours of choice (neutrals do not count, but can be used in addition) 1 image. Thing 3 – Twisted Sister Opt: Include Stitches on Project and Thing 2 is a double dare to use the sketch from TSOT and enter into TSOT #703 challenge. Note the backlinking rule.

My card uses patterned paper from a HunkyDory Duo Design paper pad and some patterned vellum. My colours are blue, yellow and green along with the neutrals in the paper. The little bird is from Gummiapan and was coloured using pencils. The tiny butterflies are also Gummiapan. I used a GKD stamp to add the branch for the bird to perch on. The circle dies and the stitched sentiment dies are from StampinUP. The actual gold embossed sentiment is from Joy Clair and my die cut flowers are from Memory Box.

When I began this card I didn’t really have a firm idea of what I wanted to create, but as so often happens it evolved by itself. I quite like the result, which is always a bonus for me.

Now it is your turn and we look forward to seeing your creations in our gallery. Above all, have fun! Thanks for stopping by, you, your time and your comments are appreciated.

Bzzzzz

This card fits two challenges and even includes the optional twist on one of them. As You See It Challenge #380 – Quadrants and CYHTP (8/2026) Anything Goes with a Twist of BEES.

I started with a piece of fairly heavy CS and an EF from Sizzix called Foliage. Its an old favourite of mine. Once I had the impression I chose two ink cubes, one in yellow and one black and swiped ink over the raised parts. Then I cut it into 2″ squares and added it to a mat gold background. All this was then added to the card front. My arithmetic is hopeless and I didn’t quite get the sizing correct so the card was cut down a 1/4 inch to make it work.

Using an unbranded Dollar store stamp set I chose the two bees and the honeycomb stamps along with the sentiment. I fussy cut them all except for the sentiment square which was done with a Memory Box die. I did round the corners using a punch. I added colour to the bees with a pencil and used a silvery glitter Sakura pen for the wings. The smaller bee is glued flat but the honeycomb and larger bee are each popped up with foam tape.

I recently came across a site that collects cards for cancer and they are slowly gaining traction province by province. I joined the group and so far I’ve donated about 30 cards. As they are now located in my own province I am aiming to add quite a few more. As a cancer survivor it seems like a worthy cause to me and it is one way I can support others. In general I’m not a person who volunteers so being able to do something nice right from home works great for me. There is apparently a sister site in the USA, so anyone interested should message me and I’ll send info if requested.

Thanks for stopping by, you, your time and any comments you may leave are always appreciated. We have house guests arriving for a few days on Sunday, so I probably won’t have time for the computer or my craft room until later in the week.

Tweet Wishes

Generally orange isn’t a colour I like to use so this challenge at Color Hues #139 Yellow and Orange forced me out of my comfort zone. I had seen a card that gave me the idea, although they used an arch frame I think. Don’t remember where I saw it or who made it so cannot credit them properly.

To make mine, I used the smallest slatted die of Craft Addiction UK arch shapes and cut 5 out of scrap yellow paper. The note card is from GKD and I added the shapes as you see, cutting off any excess where necessary. Once I had them glued properly I took a stamp set from YNS and stamped several of the birds, the balloon and the sentiment. I heat set all the images clear, so I could colour and not worry about bleeding edges.

In colouring I used Prisma pencils and an alcohol blending pen to smooth it out. I also used a copper Sakura glitter pen for beaks and wings on two of the birds and a gold one on another. The balloon was stamped with Spiced Marmalade ink and heat set clear. When everything was dry I fussy cut everything and using some foam tape popped up each piece. One bird sits on a branch that was leftover from a previous project. The sentiment was also heat embossed.

I’m actually quite pleased with how this one looks and I’m sure I’ll find someone to send it to one of these days. Many thanks for stopping by, I appreciate you, your time and any comments you may leave.

Get Well Blues

Welcome to our latest challenge here at cardz4galz and Sue is asking us to create a card using any Kraft card stock and any shade of blue. She will also be choosing the winners.

My card ended up being something entirely different that what I had originally thought about, but I like how it evolved. The EF I’ve used is a Sizzix 4 pattern 3D folder. Using a scrap piece of blue CS I ran it through to get the impression and initially went over the raised parts with some white pigment ink. I did like it, but decided that it would look better with a dark blue and liked it more. Then I took a Spellbinders emboss and cut folder and cut the arch out of more Kraft CS. The sentiment was created on my computer and added to the back before I popped it onto some foam tape and adhered as you see. Taking a Memory box layered floral die I cut the flowers and leaves out of two blues and layered them. A few tiny blue gems and some larger ones for the flower centers and my card was done.

It always interests me how an idea changes into something else and yet the end result is usually pretty. So now it is your turn and we look forward to seeing your creations in our gallery. Have fun while creating.

Thanks for stopping by, you, your time and a your comments are always appreciated.

For the Artist in You!

A speed challenge always ensures the adrenaline is way up and for me it is also when I become the most clumsy. That said, I still managed to come up with a design and decent, if not truly creative, end result. This one was completed in 8 minutes and 10 seconds. As You See It – Challenge #379 – Hastened Handicrafts speed challenge has a theme of anything crafty.

I pulled out two stamp sets, one from Amazon Globeland and the other GKD which is where my sentiment came from. As well I pulled the larger arch die from a slatted die set by Craft Addictions UK. I used the stitched outline along with the arch but didn’t use the slatted piece here. I also used a homemade, gifted to me, stencil in yellow and orange. I did think about fussy cutting the images, but realized that my time would be affected too much.

Of course the fumbling started as soon as I started the clock and even though I used some tape to hold it, the die slipped slightly during the cutting leaving a sharp edge at the curve. I tried returning it to the die and running through again unsuccessfully, so I used scissors, which made it better but not perfect. Using the stencil and pre inked sponges I added the dots randomly. Then I stamped the images and sentiment on top. I forgot that the dots would show through the images (silly me) so now I’m definitely not happy and no time to correct. My solution was to use Prisma pencils and colour in the paint box and brush holder. This worked and for good measure I took some Sakura glitter pens in various colours and added colour to the paint pots. I already had the dark Teal card base ready but I took time to cut the burgundy PP and glued it as you see before adding the shaped piece on top. I completely forgot about adding an embellishment until after I stopped the clock and likely I will add one or two before I use the card.

Many thanks for stopping by, I appreciate you and your time.

Garnish Your Margarita

It took a while for me to settle on the right images and ideas for this card challenge, but once I did everything went smoothly. The current challenge at Seize the Birthday #332-Funny/Pun-ny requires funny/pun-ny and fortunately I have a few stamps sets in my stash that fit the bill. My images come from a YNS set that had matching dies and the pun sentiment is from that set. The Cheers sentiment is from Joy Clair and the Happy Birthday is from SSS. My EF is from Spellbinders but my ink pad was very juicy which meant the ink stayed wet. Because I’m impatient, I decided to heat emboss it clear. I cut it down slightly and added more ink around the edges before adding it to the card front. The oval is from a CraftAddiction UK set and I cut two to stack them for dimension. I did the same with the images so they have both strength and dimension.

Using a VersaMark pen I went around the edge of the oval and heat embossed it in gold and the sentiments were all heat embossed in gold too. The images were coloured with water colour pencils and to ensure they wouldn’t run I heat embossed the outlines after stamping.

I like the cuteness of the images in this stamp set and had fun putting the card together. This particular stamp had the 3 images close together, but I didn’t realize that each part had an individual die. Cutting that tiny heart was a challenge due to its size. The rest was much easier.

Thanks for stopping by, I appreciate you and your time.

A Winter Scene

Welcome to Double Trouble Challenge #223. Your 3-2-1 recipe is as follows, “Something, Anything, Everything”

3 of something from your stash, 2 of anything from your stash and 1 of everything from your stash. Thing 3 Twisted Sister has the option of using foam tape or multilayering of item to add dimension and Thing 2 is the double dare of using the sketch and adding to TSOT #702 challenge. Remember the backlinking rule please.

I began my card by stamping a Penny Black scene and heat setting it so I could add colour. Using some inks and sponges I added the various colours working my way down the image. Taking an unbranded die set I cut one of the small deer and 3 rabbits to which I added a little colour before using thin foam tape to pop them on the front. My two fussy cut little birds are from a GKD set and I added some colour to these as well. The sentiment is from a YNS set and I used a Sakura glitter pen here and there for a little fun.

I had fun putting the scene together and hope that those of you participating also enjoy the process. We look forward to seeing your creations in the gallery. Many thanks for stopping by, you, your time and your comments are appreciated.

Leaf Wishes

The challenge at Color Hues is #138-Navy and Teal and I wasn’t sure if I had any ideas for it. However, a book I’ve been reading, had a very interesting and pretty cover and it set off an idea for something with stripes. This is what I ended up with.

My first step was to create the stripes and this is my second attempt as the first one was not what I wanted. I used Gina’s masking magic strips and my glass mat for getting them onto the card stock straight. Then I used Chipped Sapphire and a sponge to do the navy stripes. When they were done and dry I moved the masks so I could add the Peacock Feathers ink. While this was drying I looked through my stamps and found this set by SSS that includes dies as I wasn’t in the mood to fussy cut anything. I stamped them using Chipped Sapphire and then used clear heat embossing to set it. Using a several water colour pencils, I added colour using a darker teal and a lighter one, along with navy. While they were drying I added VersaMark ink using a fine tip brush and the liquid and doing 2 stripes at a time added clear heat embossing to give it the shine I wanted. This took enough time that the stamped pieces dried well so I die cut them and then added VersaMark onto a few leaves and clear heat embossed those as well. The teal stripes have a subtle shine as I used some Perfect Pearls powder on those. The sentiment is from Open Studio.

In thinking about the process I took to get this result, I’ve realized that I could have added VersaMark using the ink pad before I moved the masking strips, but as with so many things hind sight is always 20/20.

We’ve actually had some rain earlier today which is a relief because it is scary to see how dry things are. The fires in the Okanagan are very bad and so many communities are affected. In my thoughts I tried to send the rain to them, but we don’t have control over the weather unfortunately. It is depressing to see how many people have lost everything, but there are also stories of hope and heroes too. Other countries have sent crews to help which allows some of ours to get some rest and recharge their batteries.

My I-phone is giving me some issues since a recent update and the photo is way darker than the card looks in real life. It is a very strong card, but I like it and my hubby liked it too.

I’m off to finish some laundry now that the painters have moved to another section of the house. We are having some areas redone with the hallway to the laundry room being one section. It looks nice but I couldn’t get to my machines easily. Many thanks for stopping by, I really appreciate it.